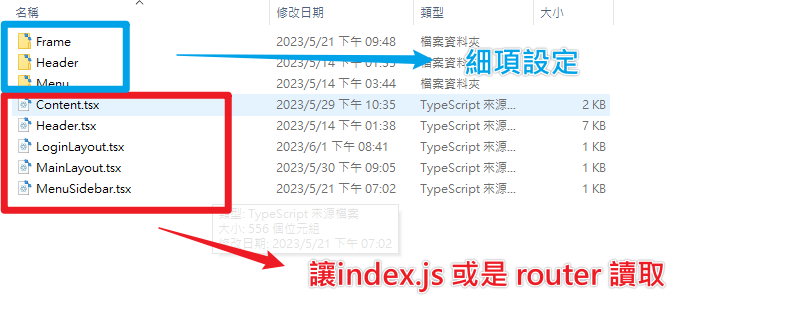
在上一篇文章中,我們已經討論了如何將 index.js 與其他版面分開,這次我們要延續這個主題,並稍微提到元件的使用方式。
元件 元件的概念是將 head、body、footer 等區塊拆分開來,以便後續功能的延伸或擴充。通常我會進一步細分,例如使用者功能清單、目錄、公用樣板 (如 Card 和 Page Title) 等。這樣做可以提升開發的可讀性,減少多行程式碼難以辨識的問題。
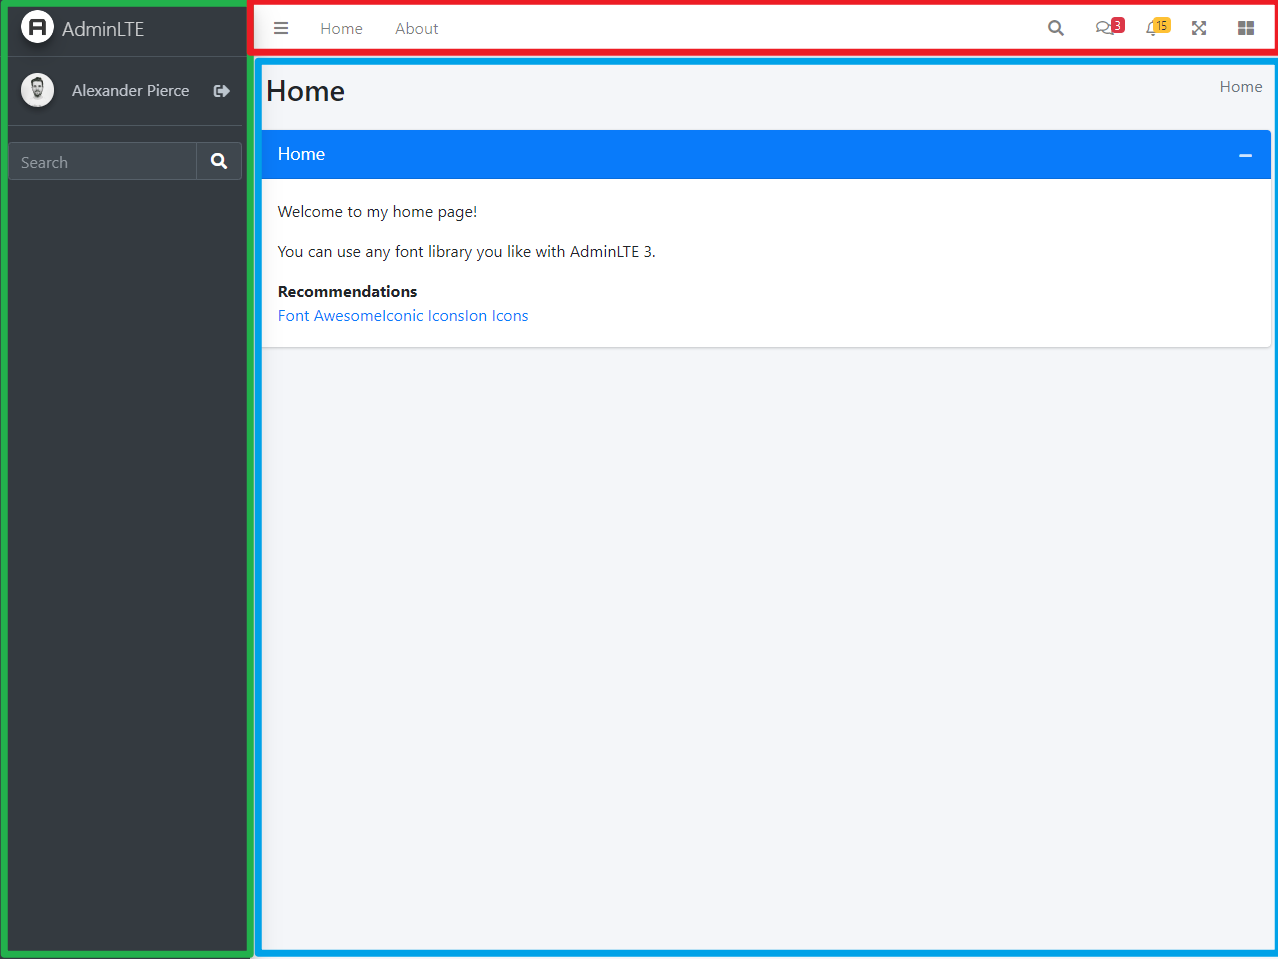
Layout 本次的範例如下圖所示。我特別使用顏色框出那些功能,以展示它們是如何被拆分為元件的方式進行撰寫。
這邊只顯示一部份,若要看完整請到 github(StartFMS.Backend.Web) 。
解釋為什麼要怎樣拆開 Header Title 。
彈性化 : 利用Ajax方式取得需要的 page
客製化 : 可能有不同客戶需求樣板可另外擴充
Header.tsx
1
2
3
4
5
6
7
8
9
10
11
12
13
14
15
16
17
18
19
20
21
22
23
24
25
26
27
28
29
30
31
32
33
34
35
36
37
38
39
40
import { Link } from 'react-router-dom' ;import users from 'admin-lte/dist/img/user1-128x128.jpg' import users_8 from 'admin-lte/dist/img/user8-128x128.jpg' import users_3 from 'admin-lte/dist/img/user3-128x128.jpg' import HeaderTitle from './Header/HeaderTitle' ;const Header = ( return ( <nav className ="main-header navbar navbar-expand navbar-white navbar-light" > <HeaderTitle > </HeaderTitle > <ul className ="navbar-nav ml-auto" > <li className ="nav-item" > <a className ="nav-link" data-widget ="navbar-search" href ="#" role ="button" > <i className ="fas fa-search" > </i > </a > <div className ="navbar-search-block" > <form className ="form-inline" > <div className ="input-group input-group-sm" > <input className ="form-control form-control-navbar" type ="search" placeholder ="Search" aria-label ="Search" /> <div className ="input-group-append" > <button className ="btn btn-navbar" type ="submit" > <i className ="fas fa-search" > </i > </button > <button className ="btn btn-navbar" type ="button" data-widget ="navbar-search" > <i className ="fas fa-times" > </i > </button > </div > </div > </form > </div > </li > .... .... </ul > </nav > ); } export default Header ;
HeaderTitle.tsx
1
2
3
4
5
6
7
8
9
10
11
12
13
14
15
16
17
18
19
import { Link } from 'react-router-dom' ;const HeaderTitle = ( return ( <ul className ="navbar-nav" > <li className ="nav-item" > <a className ="nav-link" data-widget ="pushmenu" href ="#" role ="button" > <i className ="fas fa-bars" > </i > </a > </li > <li className ="nav-item d-none d-sm-inline-block" > <Link to ="/" className ="nav-link" > Home</Link > </li > <li className ="nav-item d-none d-sm-inline-block" > <Link to ="/about" className ="nav-link" > About</Link > </li > </ul > ); } export default HeaderTitle ;
進階引入 - Content 這邊比較特殊需要使用到 ReactNode 幫我們解決一般呼叫元件不能使用 node 的問題,首先,我們先創建 interface 加入我們的專案。
1
2
3
4
export interface ContentPageProps { children : ReactNode , titleName : string };
這邊期望效果是可以套用在 container-fluid > row 下方標記,所以我們要把 ReactNode變數加入在裡面即可。
1
2
3
4
5
6
7
8
9
10
11
12
13
14
15
16
17
18
19
20
21
22
23
24
25
26
27
28
29
30
31
32
33
import { ContentPageProps } from "../../../interface/layout" ;const Content = (props : ContentPageProps return ( <div > <section className ="content-header" > <div className ="container-fluid" > <div className ="row mb-2" > <div className ="col-sm-6" > <h1 > {props.titleName}</h1 > </div > <div className ="col-sm-6" > <ol className ="breadcrumb float-sm-right" > <li className ="breadcrumb-item active" > {props.titleName} </li > </ol > </div > </div > </div > </section > <div className ="content" > <div className ="container-fluid" > <div className ="row" > {props.children} </div > </div > </div > </div > ); } export default Content ;
接下來只需要加入 Content 就可以顯示我們的內容,若content沒有加入 reactnode 會無法顯示內容。切記: 誤把 routers 作法引用在這或是引用到router ,因為這種做法 router 是無法識別。
1 2 3 4 5 6 7 8 9 10 11 12 13 14 15 16 17 18 19 20 21 22 import React from 'react' ;import Content from '../../@Shared/@Layout/Content' ;import CardFrame from '../../@Shared/@Layout/Frame/CardBodyFrame' ;const titleName = "Hoem" ;const Home = ( return ( <Content titleName ='Home' > <p > Welcome to my home page!</p > <p > You can use any font library you like with AdminLTE 3.</p > <strong > Recommendations</strong > <div > <a href ="https://fontawesome.com/" > Font Awesome</a > <a href ="https://useiconic.com/open/" > Iconic Icons</a > <a href ="https://ionicons.com/" > Ion Icons</a > </div > </Content > ); }; export default Home ;


![[Github Pages] 如何建立多個專案網站](/image/20250315_20-53-42.png)


![[Benchmarks] Database Connect 效能差異](/image/20250318_23-37-06.png)