前言
IndexedDb 是一個瀏覽器內建的資料庫,可以透過 Javascript 進行操作,並且可以在瀏覽器關閉後,資料依然存在,因此可以用來做離線儲存的功能。實際應用上通常是紀錄暫存資料,按下存檔後一次檢查、存檔讓資料可以不用平凡使用在API 傳送的一項工具。
前陣子,需要用到暫存資料的功能,因此就研究了一下 IndexedDb 的使用方式,而初期使用的確不好學習。此範例會用簡單的CRUD製作。
實作 CRUD 範例
在開始之前,不論是問 chatGPT 或是 其他教學文章,都會逃不了裝套件的問題。所以這邊就不用套件示範,直接使用原生的方式來實作。
1. 製作 Service 環境
下方程式碼中,IDBDatabase為內建Interface可以不用特別引入。稍微補充下面程式碼,因為使用v16版本是強制要帶入預設值,所以 private db: IDBDatabase | null = null; 才會這樣寫。
初始化資料庫作法如下 :
- 建立資料庫 :
indexedDB.open( 資料庫名稱 , 資料庫版本 );。
- 版本更新 :
request.onupgradeneeded = (event: any) => { ... }。
- 執行成功 :
request.onsuccess = (event: any) => { ... }。
- 執行失敗 :
request.onerror = (event: any) => { ... }。
1
2
3
4
5
6
7
8
9
10
11
12
13
14
15
16
17
18
19
20
21
22
23
24
25
26
27
28
| import { Injectable } from '@angular/core';
@Injectable({
providedIn: 'root',
})
export class IndexedDbService {
private db: IDBDatabase | null = null;
constructor() {
this.initDatabase();
}
private initDatabase(): Promise<void> {
return new Promise<void>((resolve, reject) => {
const request = indexedDB.open('MyDatabase', 1);
request.onupgradeneeded = (event: any) => {
};
request.onsuccess = (event: any) => {
};
request.onerror = (event: any) => {
};
});
}
}
|
1-1 創建資料表
創建資料表必須要使用 createObjectStore(資料表名稱, {}) 才能執行作業。而 createObjectStore 的第二個參數是一個物件,裡面可以設定 keyPath 、 autoIncrement 、 index 等等。
本案例就使用 keyPath 、 autoIncrement 、 index 來做說明。
keyPath : 設定主鍵,可以是數字或是字串,但是必須要是唯一值,否則會報錯。autoIncrement : 設定是否自動增加,預設為 false。index : 設定索引,可以設定多個,但是必須要是唯一值,否則會報錯。
補充 : 當資料庫存在且版本維持不變,卻結構變更情況下,onupgradeneeded 是不會執行的,因此需要刪除 IndexedDb 重新建立。
1
2
3
4
5
6
7
8
9
10
11
12
| request.onupgradeneeded = (event: any) => {
const db = event.target.result;
const contactsStore = db.createObjectStore('contacts', {
keyPath: 'id',
autoIncrement: true,
});
contactsStore.createIndex('name', 'name', { unique: false });
contactsStore.createIndex('email', 'email', { unique: true });
console.log('資料庫升級成功');
};
|
1-2 執行成功/失敗
這邊就用簡單資訊確認是否成功執行,如果有錯誤就會顯示錯誤訊息。
1
2
3
4
5
6
7
8
9
| request.onsuccess = (event: any) => {
this.db = event.target.result;
console.log('数据库打开成功');
resolve();
};
request.onerror = (event: any) => {
reject(event.target.error);
};
|
1-3 加入 Service 到 AppModule
要加入component 之前,必須要先加入到 AppModule,否則無法正常使用。
1
2
3
4
5
6
7
8
9
10
11
12
13
| @NgModule({
declarations: [AppComponent, HomeComponent],
imports: [
BrowserModule,
AppRoutingModule,
FormsModule,
MatTableModule,
BrowserAnimationsModule,
],
providers: [IndexedDbService],
bootstrap: [AppComponent],
})
export class AppModule {}
|
2. 加入component UI
如果要更詳細 UI 資訊,可以直接到下方參考文件取得。
1
2
3
4
5
6
7
8
9
10
11
12
13
14
15
16
17
18
19
20
21
22
23
24
25
26
27
28
29
30
31
32
33
34
35
36
| <div class="form">
<label for="">id</label>
<input type="text" name="" id="" [(ngModel)]="row.id">
<label for="">name</label>
<input type="text" name="" id="" [(ngModel)]="row.name">
<label for="">email</label>
<input type="text" name="" id="" [(ngModel)]="row.email">
<button (click)="saveContact()">Save</button>
</div>
<div>
<div>Data List</div>
<div>
<table class="table">
<thead>
<tr>
<th>id</th>
<th>name</th>
<th>email</th>
<th>action</th>
</tr>
</thead>
<tbody>
<tr *ngFor="let item of data">
<td>{{item.id}}</td>
<td>{{item.name}}</td>
<td>{{item.email}}</td>
<td>
<button class="edit-button" >Edit</button>
<button class="delete-button" >Delete</button>
</td>
</tr>
</tbody>
</table>
</div>
</div>
|
1
2
3
4
5
6
7
8
9
| export class HomeComponent {
constructor(private dbService: IndexedDbService) {}
data: any;
row = {
id: 0,
name: '',
email: '',
} as any;
}
|
3. 加入 Create 環境
基本上我在建立 IndexedDbService 到 AppModule 是沒辦法像C# DI 一樣可以保留生命週期,所以我這邊就用早期作法。首先我這邊會建立一個 connectDataBase 方便其他API呼叫時候不會造成連線不到的問題。
1
2
3
4
5
6
7
8
9
10
11
12
13
14
15
| private async connectDataBase(): Promise<IDBDatabase> {
return new Promise<IDBDatabase>((resolve, reject) => {
const request = indexedDB.open('MyDatabase', 1);
request.onsuccess = (event: any) => {
const db = event.target.result;
const objectStoreNames = db.objectStoreNames;
resolve(db);
};
request.onerror = (event: any) => {
reject(event.target.error);
};
});
}
|
透過連線時候,可以讓確保 db 變數是否還活著。
1
2
3
4
5
6
7
8
9
10
11
12
13
14
15
16
| async addContact(contact: any): Promise<void> {
await this.connectDataBase();
if (!this.db) {
throw new Error('Database is not initialized.');
}
const transaction = this.db.transaction(['contacts'], 'readwrite');
const store = transaction.objectStore('contacts');
return new Promise<void>((resolve, reject) => {
const addRequest = store.add(contact);
addRequest.onsuccess = () => resolve();
addRequest.onerror = () => reject(addRequest.error);
});
}
|
備註:
transaction(資料表, 權限) : 權限有 readwrite / readonly / versionchange 三種。- add : 新增資料。
- put : 修改資料。
- delete : 刪除資料。
- get/getAll : 取得資料。
3-1 加入 component 新增
透過 row 方式取得資料或是新增即可。
1
2
3
4
5
6
7
8
9
10
11
12
13
14
15
16
17
18
19
20
21
22
23
24
25
26
| export class HomeComponent {
constructor(private dbService: IndexedDbService) {}
data: any;
row = {
id: 0,
name: '',
email: '',
} as any;
ngOnInit(): void {
}
addContact(row: any) {
this.dbService
.addContact(row)
?.then(() => {
})
.catch((error) => {
console.error('Error adding contact', error);
});
}
saveContact(){
this.addContact(this.row);
}
}
|
4 加入 Edit / Delete 環境
依據Create 作法,可以用同樣方式修改/刪除資料。
1
2
3
4
5
6
7
8
9
10
11
12
13
14
15
16
17
18
19
20
21
22
23
24
25
26
27
28
29
30
31
32
33
34
|
async updateContact(contact: any): Promise<void> {
await this.connectDataBase();
if (!this.db) {
throw new Error('Database is not initialized.');
}
const transaction = this.db.transaction(['contacts'], 'readwrite');
const store = transaction.objectStore('contacts');
return new Promise<void>((resolve, reject) => {
const updateRequest = store.put(contact);
updateRequest.onsuccess = () => resolve();
updateRequest.onerror = () => reject(updateRequest.error);
});
}
async deleteContact(id: number): Promise<void> {
await this.connectDataBase();
if (!this.db) {
throw new Error('Database is not initialized.');
}
const transaction = this.db.transaction(['contacts'], 'readwrite');
const store = transaction.objectStore('contacts');
return new Promise<void>((resolve, reject) => {
const deleteRequest = store.delete(id);
deleteRequest.onsuccess = () => resolve();
deleteRequest.onerror = () => reject(deleteRequest.error);
});
}
|
4-1 加入 component 修改/刪除
備註 : onClickUpdate 作用是將資料帶入 row,並且將資料帶入 row,這樣就可以直接修改。
1
2
3
4
5
6
7
8
9
10
11
12
13
14
15
16
17
18
19
20
21
22
23
24
25
26
27
28
29
30
31
32
33
34
35
36
37
38
39
40
41
42
43
| deleteContact(row: any) {
let id = row.id;
this.dbService
.deleteContact(id)
.then(() => {
})
.catch((error) => {
console.error('Error deleting contact', error);
});
}
updateContact(row: any) {
this.dbService
.updateContact(row)
.then(() => {
})
.catch((error) => {
console.error('Error deleting contact', error);
});
}
saveContact() {
if (this.row.id == 0) {
this.addContact(this.row);
} else {
this.updateContact(this.row);
}
this.row = {
id: 0,
name: '',
email: '',
};
}
onClickUpdate(row:any){
this.row = {
id: row.id,
name: row.name,
email: row.email,
};
}
|
4-2 加入 component UI 修改/刪除
從 ADD 那段補click事件,並且傳入 item 即可。
1
2
| <button class="edit-button" (click)="onClickUpdate(item)">Edit</button>
<button class="delete-button" (click)="deleteContact(item)">Delete</button>
|
5 加入 List 清單
1
2
3
4
5
6
7
8
9
10
11
12
13
14
15
16
17
18
19
20
|
async getContactList(): Promise<any> {
await this.connectDataBase();
if (!this.db) {
throw new Error('Database is not initialized.');
}
const transaction = this.db.transaction(['contacts'], 'readonly');
const store = transaction.objectStore('contacts');
return new Promise<void>((resolve, reject) => {
const getRequest = store.getAll();
getRequest.onsuccess = (event: any) => {
const contact = event.target.result;
resolve(contact);
};
getRequest.onerror = () => reject(getRequest.error);
});
}
|
5-1 加入 component List 清單
1
2
3
4
5
6
7
8
9
10
| listContacts() {
this.dbService
.getContactList()
.then((contact) => {
this.data = contact;
})
.catch((error) => {
console.error('Error getting contact', error);
});
}
|
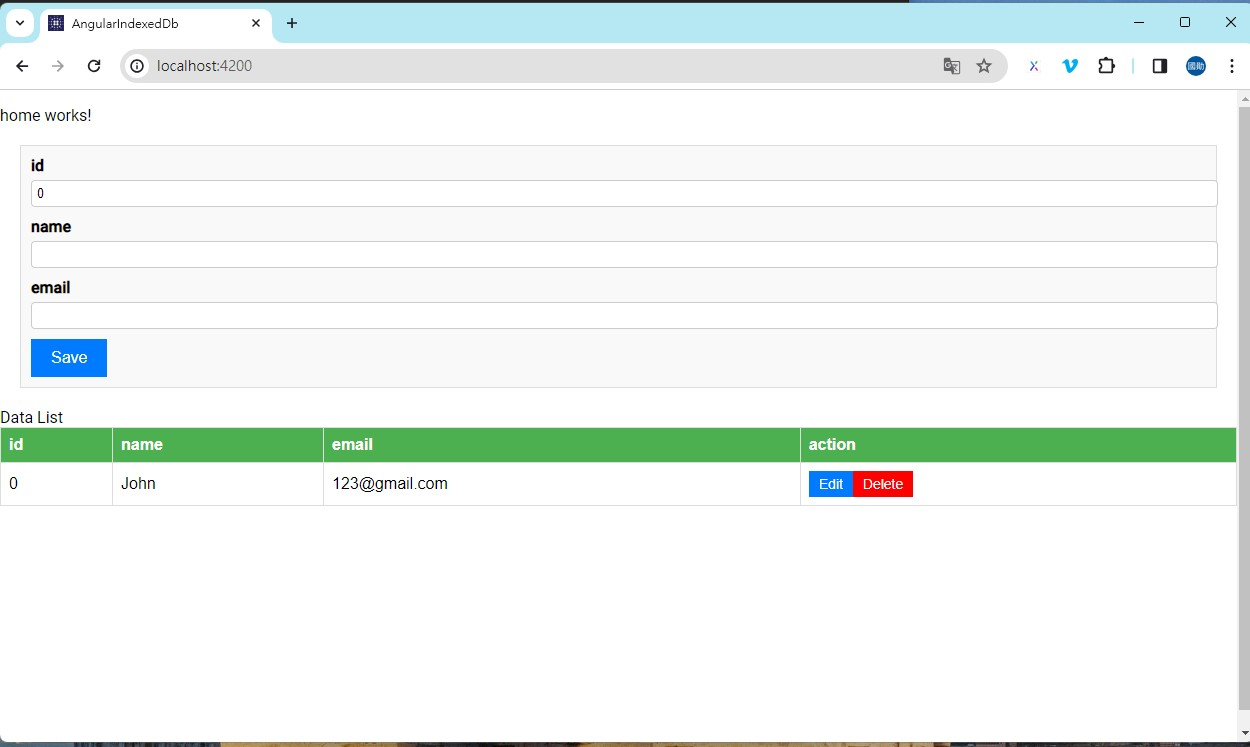
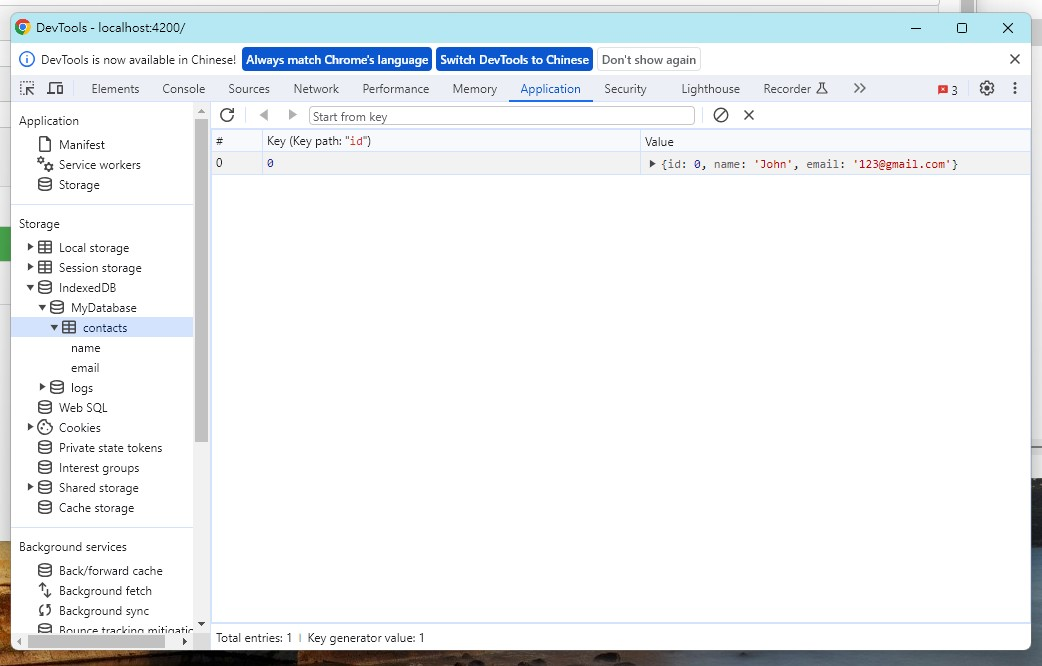
結論
以上完成簡單範例後,可以看到下方圖片一樣可以做簡單的CRUD,也能從F12 看到資料,而且不用裝套件,也不用擔心版本問題,相當方便。
但是務必小心每個瀏覽器規範,免得出現問題。
參考文件


![[筆記] Synology 創建 Docker datalust/seq 環境](/image/20250810_08-15-28.png)
![[DevOps] 創建一個 docker agent](/image/20250810_08-16-08.png)