一、前言
最近幾個月使用 github coplit 來練習 react ,順便紀錄 react 的學習過程,這篇主要是使用 api 方式加入 routes。
二、使用 api 方式加入 routes
2-1 加入 API 調用
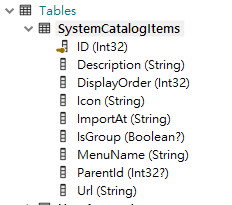
在 App.js 中加入 API 調用,並將獲取的數據設置到狀態中。以下為資料庫結構
1
2
3
4
5
6
7
8
9
| [
{
"id": 1,
"name": "首頁",
"path": "/",
"importAt": "Template/Home",
"icon": "fas fa-home"
}
]
|
以上目的是為了抓取 import 的路徑,並且將資料庫的資料設置到狀態中,以便後續使用。接著用從 API 取得資料即可。
1
2
3
4
5
6
7
8
| const [routesData, setRoutesData] = useState([]);
useEffect(() => {
fetch("https://localhost:5001/api/users/menus/items")
.then((response) => response.json())
.then((data) => setRoutesData(data));
}, []);
|
2-2 使用 map 來加入 routes
首先我們將參數以及 component 設置好,接著使用 map 來加入 routes,以下為完整程式碼。
1
2
3
4
5
6
7
8
9
10
11
12
13
14
15
16
17
18
19
20
21
22
23
24
25
26
27
28
29
30
31
32
33
34
35
36
37
| const components = routesData.map((route: any) => ({
...route,
component: React.lazy(() => import(`../component/@Views/${route.importAt}`)),
}));
return (
<BrowserRouter>
<ServicesContext.Provider value={services}>
<ToastContainer />
<Routes>
{/* user authrozie element */}
<Route path="/Login" element={<LoginLayout />}>
<Route path="/Login" element={<Login />} />
</Route>
{/* System element */}
<Route path="/" element={<MainLayout />}>
<Route path="/" element={privateElement(<Home />)} />
<Route path="/Profile" element={privateElement(<ProfileHome />)} />
<Route path="/about" element={privateElement(<About />)} />
{components.map(({ id, url, component: Component }) => (
<Route
key={id}
path={url}
element={
<React.Suspense fallback={<div>Loading...</div>}>
<Component />
</React.Suspense>
}
/>
))}
</Route>
</Routes>
</ServicesContext.Provider>
</BrowserRouter>
);
|
總結
React.lazy、React.Suspense、Component 這兩者的組合可以讓我們在使用時,可以動態的加入路由,並且可以在使用時才去載入,達到動態載入的效果。那這階段通常會使用在登入後,根據使用者的權限,動態的加入路由,達到權限控管的效果。
製作階段時候,可以參考以下資料表定義去設計資料庫,以及使用者的權限,這樣在後續開發時,可以更加的方便。如下圖所示。
)
g)